


Autonomic Nervous System 2: Restore balance with yoga
This is part two of a two-part series. Part one explores the function of the autonomic nervous system. Part two offers ways to restore balance to a stressed-out mind and body.
Restore balance to a stressed-out nervous system
Our takeaway from part one is that we want to achieve homeostasis, where the nervous system is in balance. This can be through bringing a stressed-out brain and body into a parasympathetic state, or just levelling out both sides of the autonomic nervous system.
Let’s look at some yoga poses and movements we can do to calm down a stressed-out body. Not so chilled out that you fall asleep! But maintaining just enough stimulation in the body — an alert awareness — while also calming, grounding, and centring the body.
To prop or not to prop
There are options to use props or not, depending on your preferences and what you have on hand. I have demonstrated variations with a yoga block, a folded blanket, and a bolster. See the icons below for quick reference.
Before we get started
As always, try to be present to feel what’s happening in your body. If something doesn’t feel good, please modify. There’s no need to push through pain, injuries or anything that causes great discomfort. If you are pregnant, please seek medical advice before proceeding with any new or unfamiliar movements or poses. Yoga practices and breathing techniques are not a substitute for medical treatment. If you have any medical concerns or conditions, then please talk to your doctor.
Restore balance with a yoga practice… Respond to what your body needs today, and treat it with kindness!

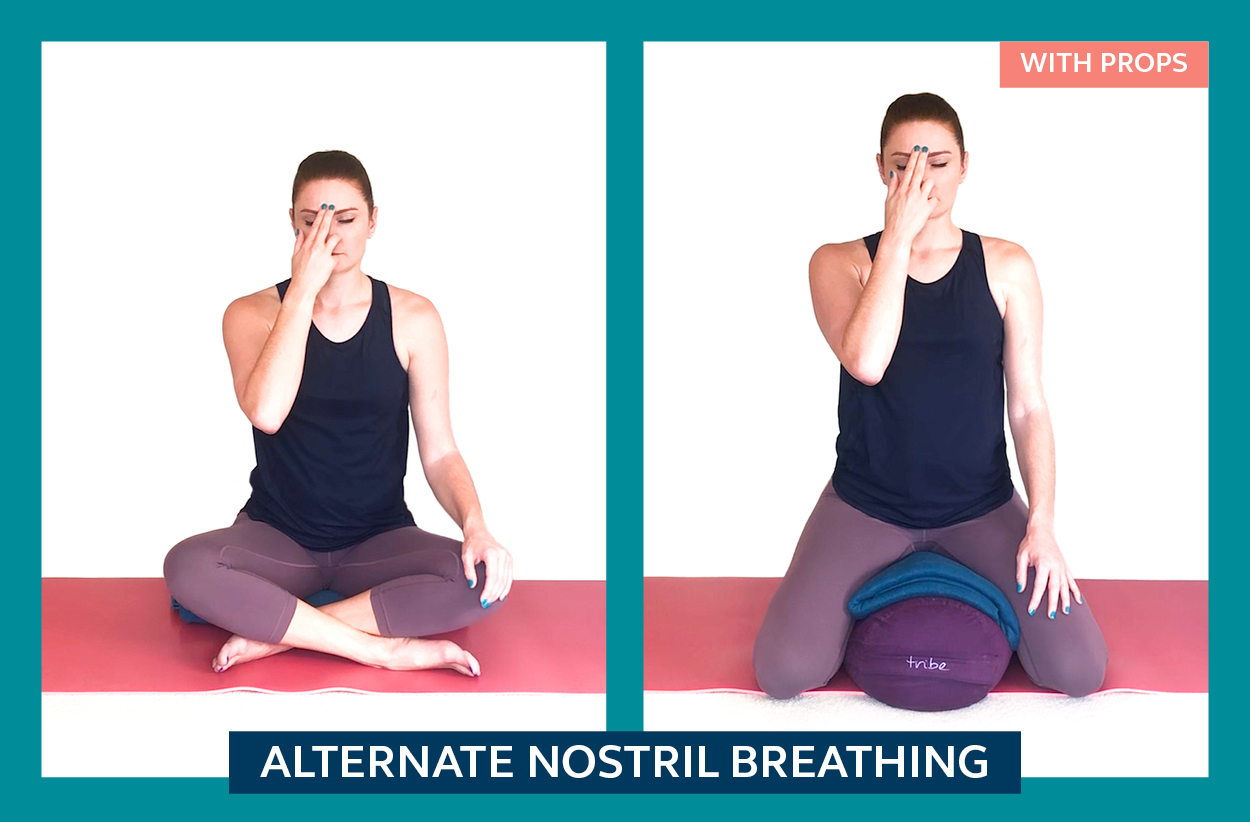
Alternate nostril breathing
Alternate nostril breathing can help you relax or create mental clarity. Bringing more awareness to your breathing can also help to increase your awareness in other parts of your life. Research from 2011 found that a six-week alternative nostril breathing program had a positive impact on physical and physiological fitness-based performance. The breathing technique had a positive influence on blood pressure, heart rate, and vital capacity.
How to practise alternate nostril breathing
Begin in a seated position, making sure you are comfortable. In the picture on the left, I’m sitting on a folded blanket so that my pelvis sits a little higher. On the right, I have a bolster aligned front-to-back with a folded blanket at an appropriate height so that I can kneel without any pressure on my knees. Look at my posture in the second picture: With the extra height and support, I’m sitting naturally taller. There is more space between my shoulders and ears, and my torso is longer. Alternatively, you could sit on a chair with a supported back and feet on the floor.
The breath cycle
- Rest your left hand on your knee. Take your right hand and place your first two fingers between your eyebrows.
- Place your thumb on your right nostril, and the third finger near your left nostril.
- Gently close your nostril with your thumb. Breathe in slowly through your left nostril. Pause to hold your breath for just a moment. Release your thumb.
- Gently close your left nostril with your third finger. Breathe out slowly through your right nostril. Pause for just a moment.
- Breathe in slowly through your right nostril. Pause to hold your breath for just a moment. Release your finger.
- Gently close your nostril with your thumb. Breathe out slowly through your left nostril. Pause for just a moment.
- That’s one cycle. Repeat from step 2. Continue for around 3-5 minutes.
Once you get used to the pattern, allow your breath to flow at a pace that feels natural. Keep your breath slow, smooth, and continuous.
PLEASE NOTE: Practising alternate nostril breath is safe for most people. Talk to your doctor before starting the practice if you have asthma or any lung/heart condition. I would recommend against practising alternate nostril breathing if you’re sick or congested. If you feel any adverse effects, such as shortness of breath, while doing the breathing technique, you should stop the practice immediately. This includes feeling lightheaded, dizzy, or nauseous. If you find that the breathing is bringing up feelings of agitation or that it triggers any mental or physical symptoms, please stop the practice.
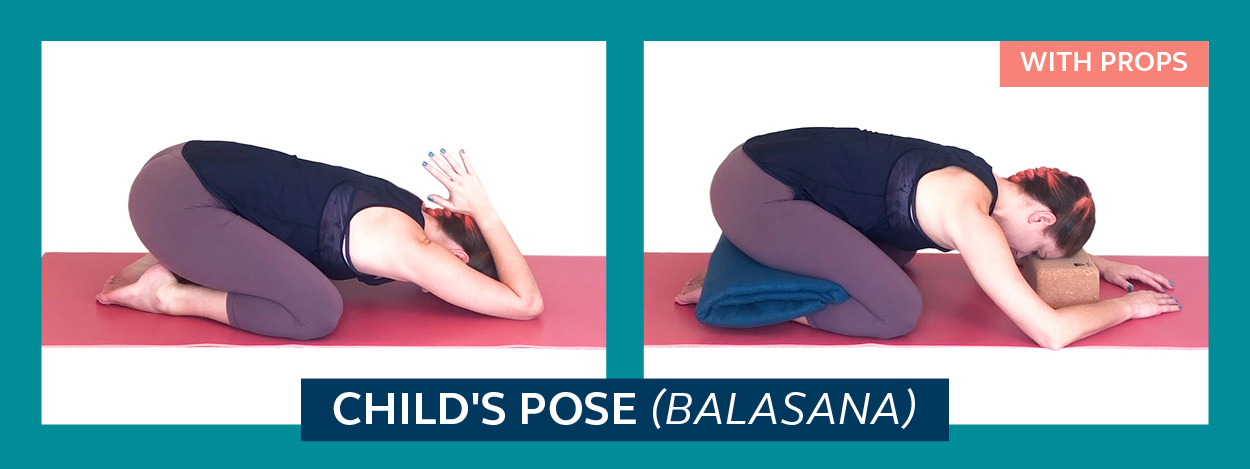
Child’s pose (Balasana)
Child’s pose is a wonderfully restorative position that can be held for as long as it feels comfortable. Placing your forehead down on the mat has an instant calming and soothing effect on a highly-active mind. It signals to your brain that you’re safe and it’s OK to rest.
From tabletop pose (hands and knees), bring your big toes together and knees a little wider. Lengthen hips back towards heels, until you can “sit” comfortably. At first, your hips may feel as though they are sticking up in the air. With time spent in the pose, aided by gravity, your pelvis will gradually begin to ease downwards.
Lower your forehead until it comes to the floor. If you can’t rest your head down, you could try putting one hand over the other and rest your head on the back of your hands. Or, rest your head on a yoga block.
Adjust the position of your hands until your shoulders feel comfortable. You could have your arms outstretched in extended child’s pose, or with bent elbows for tight shoulders. In the picture on the left, I have my hands in Anjali Mudra: Palms together, bend elbows and bring thumbs towards back of neck like a shark’s fin. Wriggle elbows further away for more opening around shoulders and armpits.
Move your knees wider so that your torso has more space, or in closer to feel snug.
Why do we do this pose?
Child’s pose is a lovely way to decompress your lower spine, particularly to combat days spent sitting at a desk, standing, or in the car. Focus on the feeling of “doming” your back and a sense of lengthening down towards the tailbone and up towards the top of your neck.
Consider how your breath might feel different in this pose. You might be more aware of your breath in the back-body: Broad ribs and spacious around the back of your pelvis.

Cat/cow pose (Bitilasana Marjaryasana)
For this cat pose to cow pose variation, we’ll keep our knees wider (rather than from tabletop). If your knees feel sore, lay a flat blanket beneath them.
Cat: Scoop your belly in and round out your back-body. Keep your neck long, without just dropping your head.
Cow: Lengthen through your front-body, moving chest between biceps. Again, think of your head position. Keep your neck long by leading with the crown of your head, instead of with your chin.
Continue to move from cat to cow in a smooth, slow flow. It can be nice to close your eyes and internalise your focus, feeling your spine ripple from flexion to extension. Exploring the contrast of these movements helps to restore balance to our nervous system.
Consider at which stage of the movement it feels best to inhale and exhale.
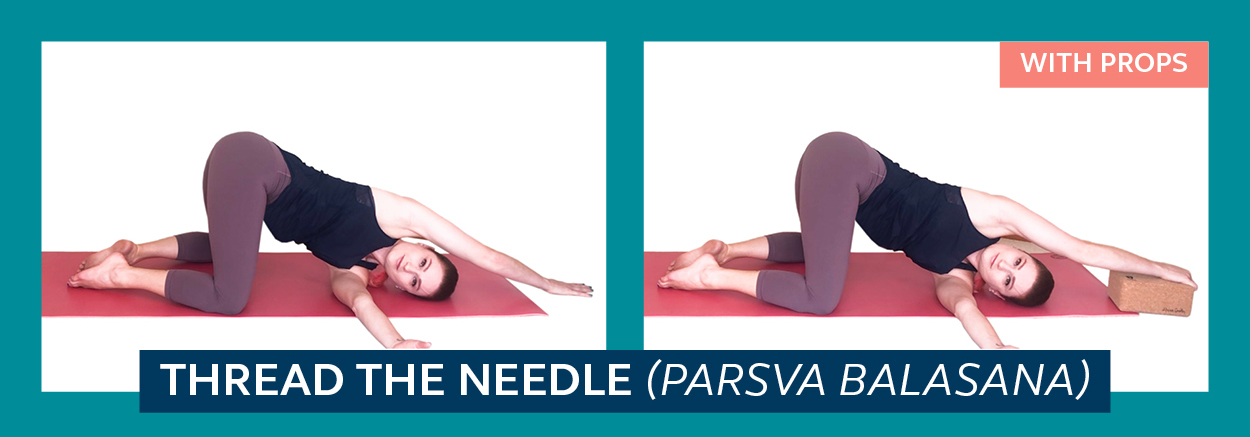
Thread the needle pose (Parsva Balasana)
With hands directly beneath shoulders, slide one arm “through the needle“, keeping it close towards the planted wrist. Keep extending under until your upper arm comes to the floor. Rest the side of your head down, ensuring your neck is comfortable. Try to keep your weight towards your upper body, so there’s space beneath you.
You could either prop the other hand where it is or extend your arm overhead. If the range of movement in your shoulder feels restricted, then rest your hand on a yoga block. If your knees feel sore, then lay a flat blanket beneath them.
This is not a totally passive yoga pose. Maintain a neutral spine by engaging a little tone in the abdominal muscles. Create a small amount of leverage in the lower arm to continue revolving the upper body.
This is one variation of thread the needle pose. The benefits include stretching the shoulders, arms, upper back and neck, as well as gently twisting through the torso and mid- to upper-spine.
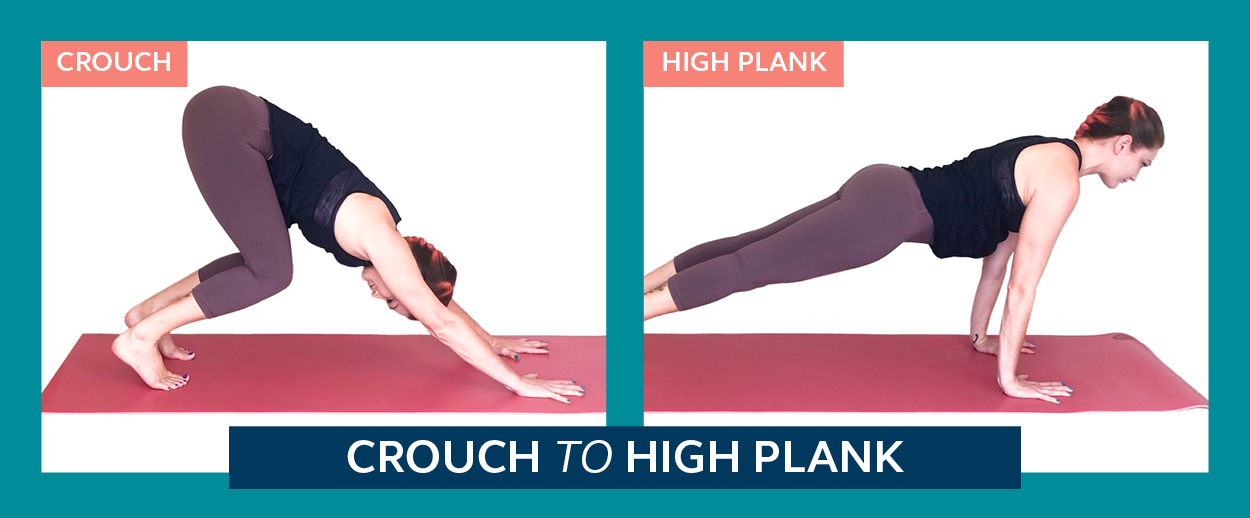
Crouch to High Plank
From a neutral tabletop position, with knees tracking directly under hips, tuck toes under and lift hips high and back. Press gently into strong hands — spreading fingers and pressing into the base of fingers to the weight is not directing downward into your wrists.
Feel the lengthening of your spine and draw shoulders away from ears.
Crouch: Bend knees deeply, heels high, and move chest towards thighs.
High plank: Press into the balls of your feet and shift weight forward until shoulders come over wrists.
Lift hips high and press back to crouch — three times total. Try to maintain a neutral spine, however we are still achieving a small amount of flexion/extension like in cat/cow.

Forward fold (Uttanasana)
Walk feet up towards your hands, hip-width apart, into a forward fold pose. Bend knees generously and let your belly move towards your thighs. You could let your arms hang freely, or hold opposite elbows, or rest hands on a block.
If you want to find movement here, shake your head yes/no and shimmy shoulders. You could sway from one side to the other, or hold completely still.
If you feel dizzy when you hang upside down, try bringing your forearms to your thighs to lift your chest higher.
Give your attention to your feet. Have a play with rocking your weight back and forth. How does it feel when you rock back into your heels — do you feel your thighs activate? What feels different when you rock forward into the balls of your feet — do your legs lengthen and hips move towards the sky? Can you find a position of stability somewhere in between?
What should we feel in this pose?
It’s common in a forward fold to solely focus on stretching the hamstrings. However, by focussing attention on the stretch at the back of the legs, it’s possible to lose awareness of the spine. A “tight” feeling up the back of the legs could be to do with the structure of the pelvis restricting the body from hinging any further. If we then continue to push through the “tight” feeling in the hamstrings, it could potentially be straining the lower back due to skeletal restriction, rather than muscle length.
I always encourage participants to begin with generously bent knees and then gradually feel a tilt of the pelvis, rather than simply focussing on “stretching” the hamstrings.
To come up to standing, scoop your belly in towards your spine and slowly roll up, letting arms hang loose. Standing in mountain pose, let your weight rock back into heels, forward into balls of feet, and eventually settle into a neutral alignment — Restore balance in a tall, easeful, sustainable position.

Shake it off
Let’s loosen up by taking a step to the side, bringing weight into one foot and letting arms swing and wrap around your waist. Continue to step from one foot to the other, arms swing freely (make sure you have space around you!!) and hands slapping gently around your body.
After a few big swings to each side, gradually make the movement smaller, retreating your centre of balance inwards, until finally returning to mountain pose. Close your eyes and feel where your “centre” is in your body: Front? Back? Left? Right?

Batman vs Superman
Here we are exaggerating the idea of our centre of balance being in the front-body or the back-body. By enhancing these positions, which also physically emulate the SNS/PNS states, we can then try to restore balance to the nervous system.
Now we’re having fun! Let your arms hang forward and shoulders hunch, as though you are Batman draping his batcape over his body. Then, roll shoulders back and turn palms open, as if you are Superman ready to launch off into the sky.
Keep moving from Batman to Superman, beginning to emphasise the movements. Batman rocks back into his heels, while Superman floats his heels off the ground. How smooth can you make this movement? Just like our cat/cow, feel the flexion and extension of your spine. Be mindful of how your head/neck move in relation to the rest of your spine. Do you feel disconnected at this part of your body?
Slowly reduce the movements until you are only very lightly rocking your weight forward and back on your feet. With your eyes closed, settle into a neutral position in mountain pose, where your body feels tall, broad, open, stable and easeful.
Through this exploration of contrast in our movements, we can then begin to restore balance to the nervous system.
Now focus attention on your breath. Where do you feel your breath in your body? At the front? At the back? To the sides? High in the chest or low in the abdomen? Something else? Observe your breath with open curiosity, free of judgement.
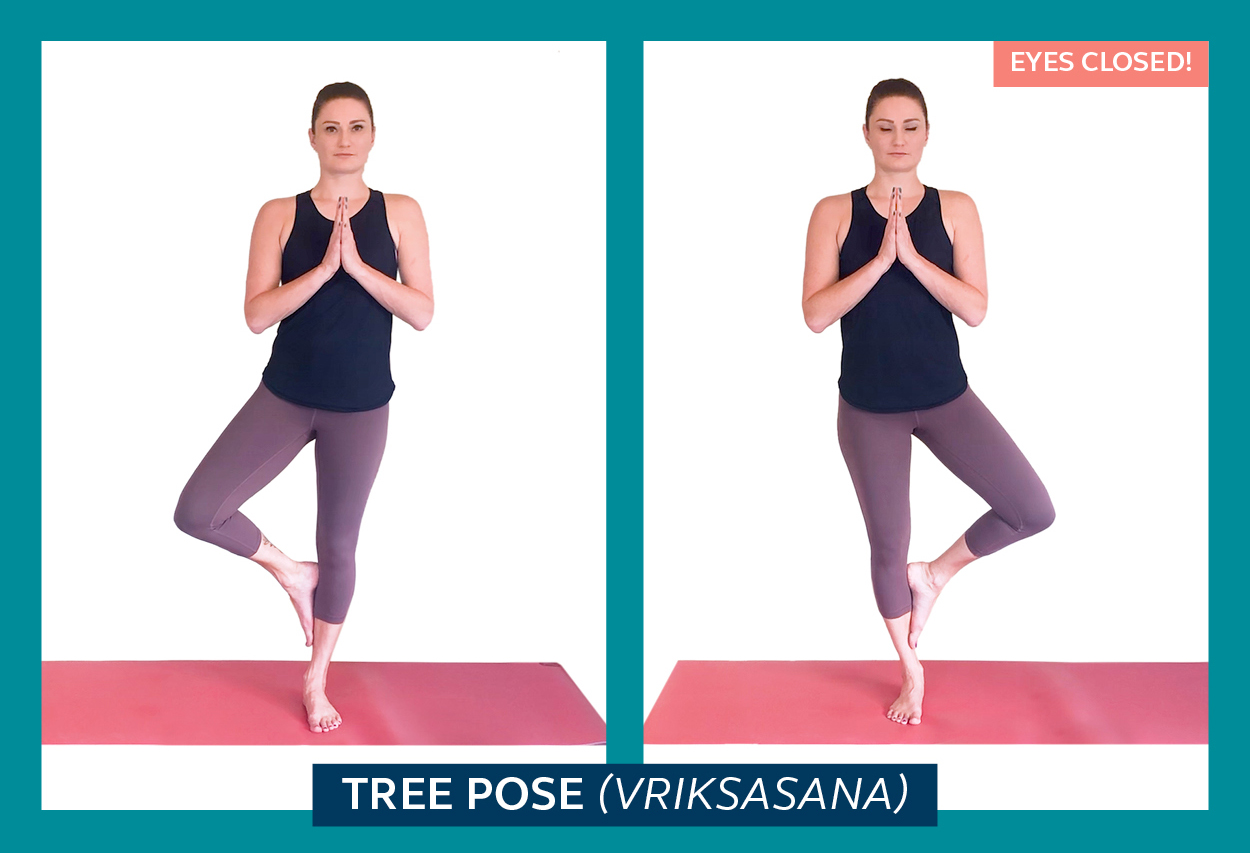
Tree pose (Vriksasana)
Step your feet together and bring hands together at your heart centre. Slowly lift one foot, opening your knee to the side, and cup your calf with the sole of your foot. If your standing ankle begins to wobble, then embrace this feeling! We are developing strength, stability, and proprioception (body awareness).
Float your foot off slowly, trying to keep your hips in the same position. Still moving slowly, lower your foot to the floor, then allow your weight to shift into that leg. Lift the other foot off the ground and cup your calf.
Repeat once more on each side. This time, can you challenge yourself to close your eyes? Or, even just a slow blink?
This is such a simple pose, however, it can be one of the most challenging! For greater improvement to your balance, strength, and joint stability, how can you bring this into your daily routine? How about when you are standing at the stove or brushing your teeth?
If you find these standing balance poses to be quite difficult, then stand against a wall or hold onto the back of a chair for support. This can also be a great rehabilitation exercise to restore balance and strength after an ankle injury.*
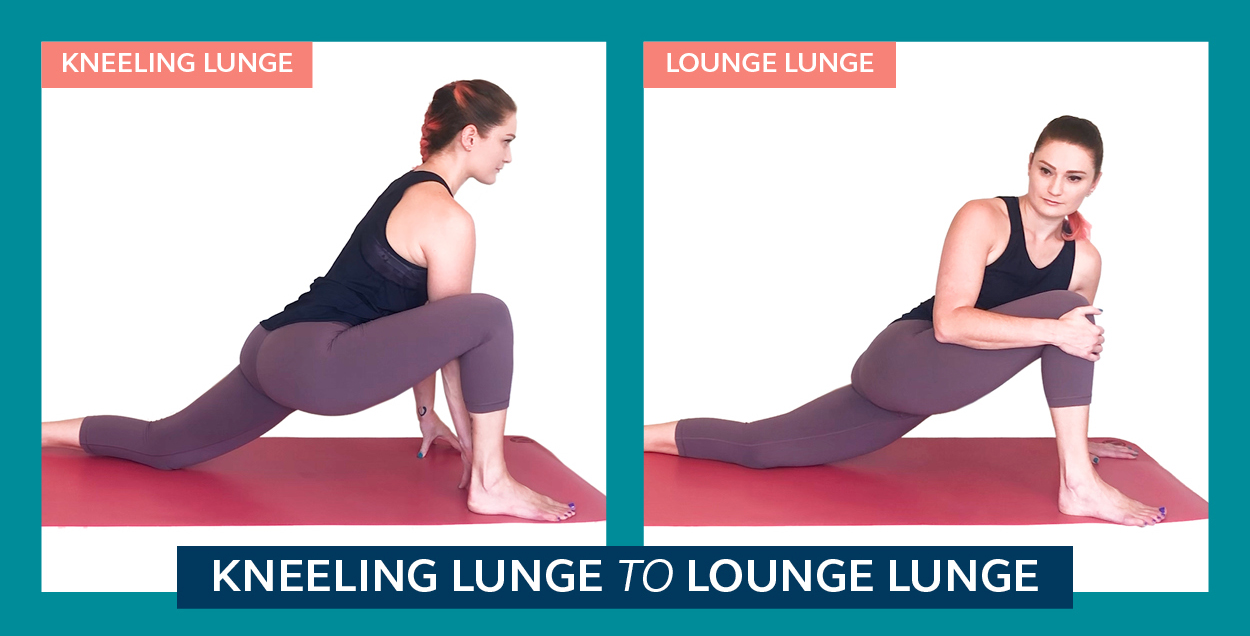
Kneeling lunge to lounge lunge
From a crouch or tabletop position, step one foot right the way forward outside your hand. Or, from a forward fold, step one foot a long way back into a lunch. lower your back knee to the floor and flatten the foot. If your back knee feels tender against the floor, then you can place a flat blanket beneath it.
Make sure your front foot is far enough forward to flatten the heel down. By bringing weight into your heel, this pose is likely to feel more stable. If you feel your body needs to be higher, or you feel any pain in your hips/back, then bring your forearm to your thigh for support. If you feel that you can bring more depth to your pose, then touch fingertips or palms to the floor inside your foot.
Notice the position of your body.
Are your collarbones curving inwards and your shoulders hunching forward? If so, your spine may be doming like in cat pose. This will most likely mean that you are lifting out of your hips, hence, you are not getting the benefits of a stretch in the hip flexors. Feel length up through the front of your body and out through the crown of your head. Bring your neck into a comfortable alignment, just like in cow pose.
Let’s hold for a few easy breaths.
Now, moving into a lounge lunge. Bring your arm — the same one as your front leg — around the outside of your thigh until your fingers wrap the front of your knee. Begin to adjust your hips — maintaining ease and avoiding pain — by revolving the opposite hip downwards. You could adjust the position of your hand on the floor, further forward if you need the space. This pose is so much about feeling it out and seeing where it feels good to go. If it feels good, then the front toes could turn out.
Again, this is not a completely passive pose. Keep a little tone in both inner legs so that your body remains stable. Check that your neck is comfortable, and visualise a gently lengthening and spiralling line of energy in your body.
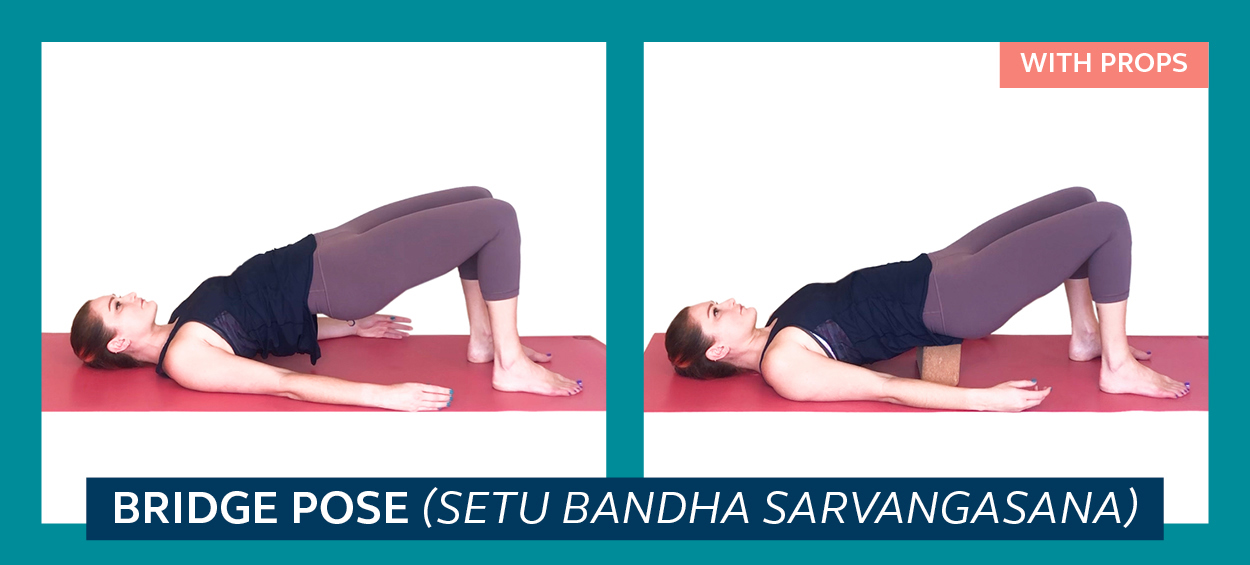
Bridge pose (Setu Bandha Sarvangasana)
Yusss, we’re heading to the floor! Lie on your back with your knees bent up, feet flat. Shuffle your feet a little closer in towards your body, so ankles are under knees, keeping feet and knees hip-width apart. Slightly engage your inner thighs in order to maintain this position. Bring arms down the sides of your body.
As we lift to bridge pose, press down into the soles of your feet and feel the reciprocal movement in the pelvis — wanting to lift off. Keep pressing into feet and lift hips, engaging glute muscles and hamstrings.
Arms can remain at your sides, or hold your pelvis with your hands for support. Alternatively, place a yoga block on its side beneath your sacrum (the flat bone at the base of your spine) so that your hips can rest. If you are using a block, ensure you maintain tone in your muscles so that you are not dropping your full body weight onto the block.
If you’re not using a prop, continue to raise your hips high and shuffle up onto the backs of your arms, lifting chest towards chin. Notice if you feel any discomfort in your lower back. Consider increasing or decreasing the “effort” in your glutes, hamstrings and inner thighs, and also generate resistance from the ground. Get to know the best position for your body that is stable, easeful and sustainable.
Bring attention to your neck. Ensure the back of your neck is long, while also creating space around your throat. Adjust the tilt of your chin until your neck is comfortable.
Meet your edge then soften back from it
Now, we have reached the highest range of the pose. Let’s soften back from our edge and instead find a more neutral alignment where we can create a sense of lengthening from shoulders to hips to knees. Just like cat/cow; just like Batman vs Superman, restore balance in your pose by feeling for a place of ease and sustainability. Once you’re there, bring your attention to your breath. How easeful can your breath be?
When you are ready to lower, roll down through your spine slowly and incrementally. Eventually, when your hips land, allow your muscles to relax. Open arms wider at your sides. Keeping feet touching the floor, let one knee fall partway to the side then come back to centre. Other knee partway to the side and up. Then slow down, letting knees move from side to side — together or wide apart — gently rocking across the back of your pelvis.

Happy baby pose (Ananda Balasana)
Gather both knees gently towards your chest, resisting any urge to squeeze them tightly. Just like a flipped version of child’s pose, bring big toes together and knees wide. Reach up from the inside to take hold of your shins or ankles. Once you have taken hold, allow your head and shoulder blades to rest comfortably to the floor, so the neck isn’t strained. Encourage the back of your pelvis to anchor to the floor. Gradually, with time, patience and gravity, your hips will begin to open and ease.
You could hold right here or, if you want to move into a happy baby pose, pick up the soles of your feet and lift them towards the sky. Keeping knees wide, stack ankles over hips with a gentle downward energy. Let shoulders, neck and head relax back down to avoid neck strain. Keep the back of your pelvis drawing down towards the floor.
Whichever position you are in, relax your belly, ribs, chest, throat and jaw. Invite slow, calm breaths into your body. Remember that the goal here is to calm down and restore balance to your nervous system.
Try rocking from side-to-side for a more playful pose.
Why do we do this pose?
Happy baby pose, or its companion with feet together, is a wonderful way to open through hips, lengthen hamstrings and inner thighs, and decompress the sacrum. It stimulates the digestive system and can help combat chronic stomach issues*.
This infantile position can transform a busy adult mind into a more carefree and playful state, which helps to relieve stress and foster happiness.

Reclining bound angle pose (Supta Baddha Konasana)
Turn the soles of your feet together and lower them slowly to the floor with your knees wide. If you immediately feel uncomfortable in this pose, the first thing you can try is to adjust your feet further away or closer in towards your body. If you are still feeling any pain or discomfort, or have S.I. Joint instability, I would recommend instead bringing your knees up and feet flat to the floor.
This pose is 10X better with props.
Fold a blanket in such a way that the first layer is beneath you from your lower back upwards. Lay the second fold beneath your head, and then a third smaller fold beneath your neck. This last fold could be rolled, but ensure that it fits the natural curves of your spine correctly. It might take a bit of time to get this configuration to match up to the proportions of your body, but it’s worth it!
Lay a yoga block in a comfortable position beneath the outer edges of your legs, so they can lay open without any strain at the groin, inner thighs or pelvis.
Arms could rest open at your sides, or instead bring one hand onto your chest, one onto your belly. Restore balance by creating a connection between your mind, body and breath. What you choose today may depend on your current state of mind.
Stay in reclining bound angle pose (aka reclining cobbler pose) for as long as it feels comfortable, either to the end of your practice or eventually extending out to corpse pose.
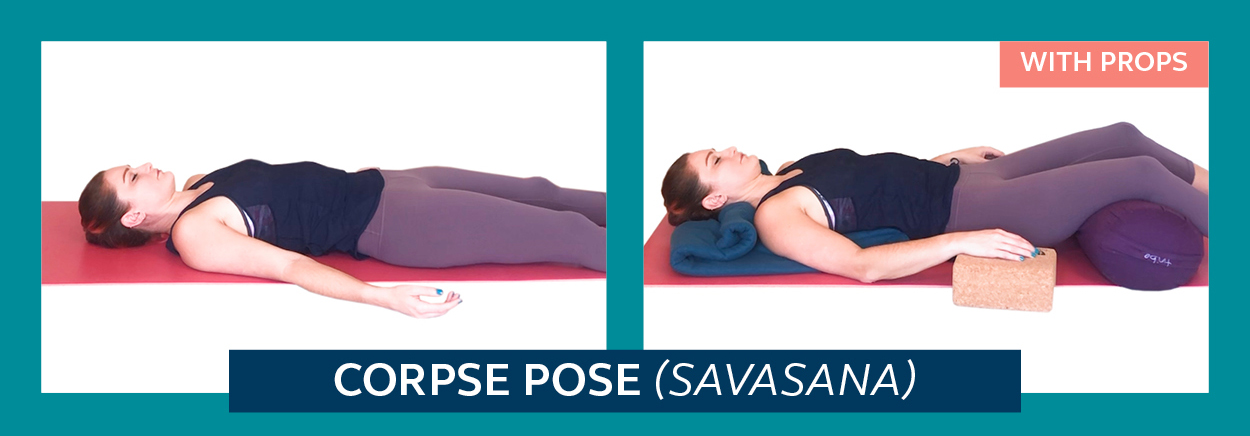
Corpse pose (Savasana)
What a way to finish the practice. Corpse pose, where we lay flat with legs long and arms at the sides, can be uncomfortable for some people. If you are experiencing any discomfort in this position particularly in your lower back, try bending your knees up with feet flat to the floor. Knees could point straight up, or tent together with feet a little wider.
Alternatively, a pose that is supported by props could be just what you need. For the ultimate restorative practice, have a look for teachers offering yoga nidra. Here’s a great place to start.
A luxuriously restorative position can be achieved with a few simple props.
Just as we did for the previous pose, start with a blanket folded in such a way that the first layer is beneath you from your lower back upwards. Lay the second fold beneath your head, and then a third smaller fold beneath your neck. This last fold could be rolled, but ensure that it fits the natural curves of your spine correctly.
Arrange a bolster widthways to lay beneath your knees. This adjusts the position of the pelvis which reduces compression in the lower back. You could also lay out an additional blanket to support behind your ankles.
Then, if you have two yoga blocks, lay them beneath your hands, which will provide relief in hunched shoulders. Or, get creative with any other household items!
PRO TIP: Scrunch in the sides of the blankets in towards your neck, lower back and ankles. This will cradle your body, which provides a sense of support and nurturing.
What next?
As you rest in these last two positions, the goal is not to become so restful that you get sleepy; Rather, the goal is to maintain an alert awareness in the body, observing the experience in the moment with focussed attention.
Lastly, make sure you come out of these last two poses very slowly and mindfully. Take a moment to sit upright for a few breaths to reflect and restore your energy before moving on with your day.
In summary
This sequence has been developed to restore balance with yoga poses, movements and breathing techniques. We have moved through poses that personify the sympathetic nervous system and the parasympathetic nervous system, then explored the space of neutrality in between. Calm your stressed out mind and let your weary body recover.
Namaste!
*Please remember: I am not a medical professional and am in no way offering medical advice!
No Comments
Leave a reply
You must be logged in to post a comment.